Table of contents
What Is Statistical Process Control?
Statistical Process Control is not a new concept in the industry. In 1924, an employee at Bell Laboratories created the statistical process control (SPC) chart. He also developed the idea that a statistical process could be used. William A. Stewart was his name. In 1939, he published a book called “Statistical Method from the Viewpoint of Quality Control”. During World War II, the SPC method was widely used by the military at munitions and weapon facilities. They were forced to find a more effective way to monitor the quality of products without compromising safety due to a high demand for their product. SPC met this need. After the war, SPC techniques were no longer used in America. The Japanese manufacturing industry adopted it and still uses it today. SPC began to gain popularity again in the 1970s due to American industries feeling pressured by high-quality products imported from Japan. SPC is widely used in many industries today.
Understanding Statistical Process Control (SPC)
Statistical Process Control (SPC), monitors manufacturing processes using technology that measures and regulates quality. SPC uses a variety of machines and instruments that provide data on quality based on product measurements and readings from the process. The data collected is then evaluated and monitored in order to control the process.
Statistical Process Control is an easy way to encourage continual improvement. Managers can make sure that a process works to its maximum potential when it is constantly monitored and controlled.
It has been a long time since the concept of statistical control was introduced. William A. Shewart designed the first control chart in 1924 and was the pioneer of the statistical control concept. During World War II, this quality control method was widely used in ammunition and weapon facilities. Statistical process controls monitor the safety of products while maintaining their quality.
Today, manufacturing industries around the world use statistical process control extensively.
The prices of raw materials are constantly changing, and there is a lot of competition. These factors are beyond the control of companies, but their quality can be controlled. To be the market leader, they must constantly improve their quality, efficiency, and cost margins.
Why Use Statistical Process Control?
The competition for manufacturing companies is increasing. Raw material costs are also increasing. Most of these factors are beyond the control of companies. Companies must therefore focus on the things they can control, namely their processes. Companies must constantly strive to improve their quality, efficiency, and costs. Many companies still rely on the inspection of products after production to detect quality problems. SPC charts are used to transition a company away from detection-based quality control to prevention-based controls. The operator can detect trends and changes in a process by monitoring its performance in real time.
How to Use Statistical Process Control?

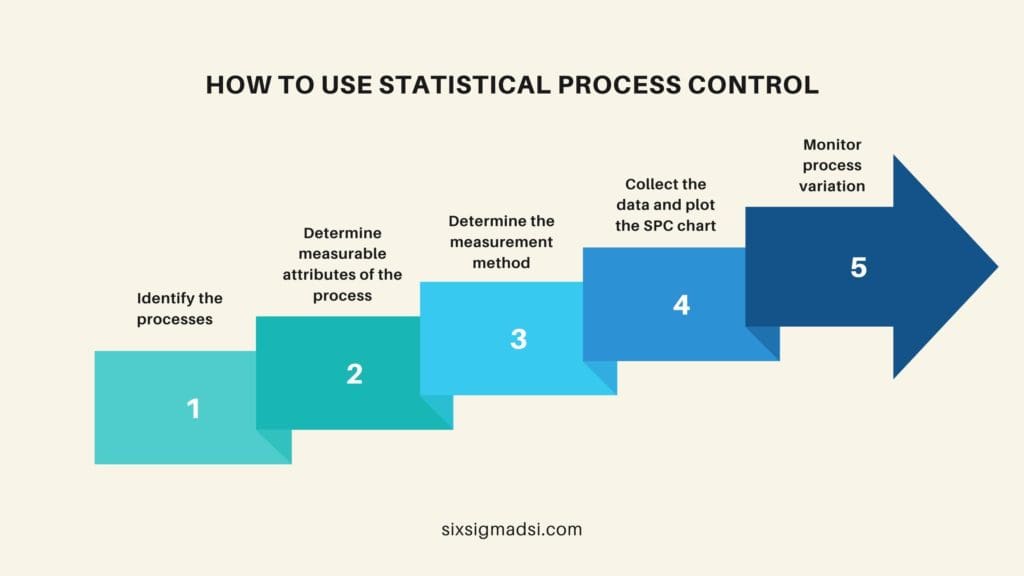
The manufacturing process should first be evaluated in order to identify the major waste areas. Rework, scrap, and excessive inspection times are examples of waste in the manufacturing process. These areas would benefit most from the SPC tools. SPC does not monitor all dimensions due to the cost, time, and production delays. A Cross-Functional Team (CFT), during a print review or Design Fault Mode and Effects Analysis exercise, should identify the key or critical features of the design or the process prior to SPC implementation. The data would be collected on these critical or key characteristics.
Collecting data
SPC data can be collected as measurements of product dimensions/features or readings from process instrumentation. The collected data is recorded on different types of control charts based on what type of data was collected. The correct chart type is essential to obtaining useful information and gaining value. Data can be continuous variable data or attribute data. Data can be recorded and collected as an individual value or averaged over a number of readings. Below are some general guidelines and examples.
Variable data
- Chart Individual-Moving Range: Use this chart if you have data that is made up of individual values
- Use the Xbar-R chart if you want to record data in groups of no more than 8
- Use the Xbar-S chart if you have a sub-group larger than 8
Attribute data
- P chart – For recording the number of defective parts within a group.
- U chart for recording the number of defects in each component
Control Charts
The X-bar chart and the R-chart are two of the most commonly used control charts. The X-bar chart represents the “average” or “mean value” of the variable x. The X bar chart shows the variation of the sample averages or means. The Range chart displays the variation in the subgroup. The range is the difference between the maximum and minimum values. To build an R and X-bar chart, you must follow the steps below:
- The sample size is indicated by “n”. In many industries, 4 or 5 is a common sample size. The sample size should not exceed 8 people. Determine the frequency of the sampling.
- Begin collecting your first set of samples. As a general rule, collect 100 measurements in 4 groups to get 25 data points.
- Calculate the average for each group of 25 samples.
- Calculate the range for each sample of four measurements. The range is calculated as the difference between the highest value and the lowest value of each sample set.
- Calculate the X-bar, which is the average of all the averages. This average will be represented by a solid line in the center of the X-bar chart.
- Calculate the average or “R” value of the sample ranges. This will be the middle line of the Range chart.
- Calculate the upper and lower control limits (UCL, LCL), for each chart. The control limits are different from the limits specified by the engineer. Control limits are calculated from data. The majority of engineers use statistical software to perform calculations automatically.
After the chart has been set up, the technician or operator will measure several samples, add them together, and then calculate the average. The value is recorded on the control chart or X-bar chart. Also, the range of subgroups should be recorded. To track the stability of a process, sample measurements must be taken at regular intervals and recorded with the date and time. Be on the lookout for special causes or assignable factors and adjust your process accordingly to maintain a stable, in-control process.
The X bar and R chart are just one of many control charts that are available to monitor and improve processes. Contact one of Quality-One’s many professionals for assistance in determining best practices to improve processes.

Analysing the Data
Data points on a chart of control should be between the limits if only common causes, and not special causes, have been identified. Common causes fall within the control limits, whereas special causes are outliers. In order for a statistical process to be considered in control, there must be no special cause in any SPC chart. No special causes will be identified for a process that is in statistical control. The data should also fall within the control limits. Here are some examples of common causes of variation:
- Material properties can vary within a specification
- Changes in humidity or temperature during the seasons
- Wear and tear on machine tools or machines
- Variability of operator-controlled settings
- Normal Measurement Variation
Special causes, on the other hand, are usually outside the control limits and indicate a radical change or shift in the process. Below are some examples of variations due to special causes:
- Failed controllers
- Improper equipment adjustments
- Changes in the measurement system
- Process shift
- Machine malfunction
- Design specifications are not based on raw material properties
- Broken tool, punch, bit, etc.
- Unexperienced operator unfamiliar with the process
The inspector will monitor a process using SPC charts to ensure that all data points fall within the control limits. They will also look for any trends or sudden changes. In the event that any particular causes of variation have been identified, the inspector should take appropriate actions to identify the cause and implement the corrective measures to return the process back to a statistically controlled state.
Other variations or patterns within the control limit should be tracked and investigated. They include, but are not restricted to:
- Runs with 7 or more data points in a line on the centerline of one process side
- Multiple data points are spread out farther or closer.
- Trends that are characterized by seven or more data points rising or falling consistently
- Data spreads that are above or below normal
We can ensure that we produce parts that meet customer requirements by addressing any causes, trends, or shifts. Always keep in mind that the control limits must always be within the specified limits set by the engineer or customer. Contact one of Quality-One’s Subject Matter Experts for more information on the SPC process, available tools, mentorship, training, or assistance with the implementation of SPC. We are ready to assist you with any information or assistance that you may need.


