
Decision rules in Statistical Process Control (SPC) are specific criteria applied to control charts to determine when a process has shifted, drifted, or become unstable in a way that warrants investigation. A control chart plots process data over time and draws three reference lines — the centerline (process mean) and the Upper and Lower Control Limits (UCL and LCL) at ±3 standard deviations.
Decision rules define what patterns of data within and around those boundaries signal a non-random, assignable cause rather than normal process variation. In Six Sigma, decision rules are the mechanism that makes the Control phase of DMAIC operational: they tell practitioners exactly when to stop, investigate, and act.
Table of contents
Meaning of Decision Rules in SPC
Decision rules are criteria applied to control charts to identify out-of-control signals — patterns in the data that are statistically unlikely to occur from common cause (random) variation alone, indicating that an assignable cause has affected the process. The most widely used set is the Western Electric (WECO) rules, codified in 1956 by Western Electric Company’s manufacturing division.
The four WECO rules define specific patterns — a single point beyond the control limits, two of three consecutive points in Zone A, four of five consecutive points in Zone B or beyond, and eight or more consecutive points on the same side of the centerline — that each signal the need to investigate the process for a root cause.
Key Takeaways
- Decision rules are criteria applied to control charts to detect non-random patterns that signal an assignable cause of variation has entered the process.
- Control charts are divided into six zones — three on each side of the centerline — labeled A (2σ to 3σ), B (1σ to 2σ), and C (0 to 1σ). Zones A and B are closer to the control limits; Zone C is closest to the centerline.
- The four Western Electric (WECO) rules are: (1) one point beyond the ±3σ control limits; (2) two of three consecutive points in Zone A or beyond on the same side; (3) four of five consecutive points in Zone B or beyond on the same side; (4) eight or more consecutive points on the same side of the centerline.
- Western Electric rules were codified by a specially appointed committee and published in the first edition of the Western Electric Statistical Quality Control Handbook in 1956.
- Lloyd S. Nelson expanded the WECO rules to eight rules in 1984. Nelson Rule 2 is nine (rather than eight) consecutive points on the same side of the centerline. Nelson Rules 5–8 add tests for trends, oscillation, stratification, and overcontrol patterns.
- When all four WECO rules are applied simultaneously, the false alarm rate rises to approximately one false signal per 91.75 observations. Applying all rules increases sensitivity but also increases the chance of investigating a process that is actually in control.
- In Six Sigma’s DMAIC framework, decision rules are a Control phase tool. They define the trigger conditions for the response plan in a process control plan.

Public, Onsite, Virtual, and Online Six Sigma Certification Training!
- We are accredited by the IASSC.
- Live Public Training at 52 Sites.
- Live Virtual Training.
- Onsite Training (at your organization).
- Interactive Online (self-paced) training,
What Are Decision Rules in SPC?
A control chart is the primary monitoring tool in a Six Sigma Control phase. It plots process measurements over time and displays three reference lines that define acceptable process behavior: the centerline (the process mean, X̄) and the Upper and Lower Control Limits (UCL and LCL), positioned at ±3 standard deviations from the mean.
When a process operates under only common cause variation — the inherent, random variability present in every stable process — data points fluctuate around the centerline in a predictable, symmetric pattern. Most points fall near the center. A few fall closer to the control limits. Almost none fall outside them.
Decision rules are the specific pattern tests applied to a control chart to determine when the data no longer looks random — when something in the process has changed in a way that cannot be explained by chance alone. They answer the most important practical question in SPC: when should a practitioner stop the investigation and act?
Without decision rules, a practitioner looking at a control chart must rely entirely on intuition. Decision rules make that judgment objective, consistent, and defensible. They reduce both the risk of missing a real process shift and the risk of investigating a process that is actually fine.
The Zone System: How Control Charts Are Divided
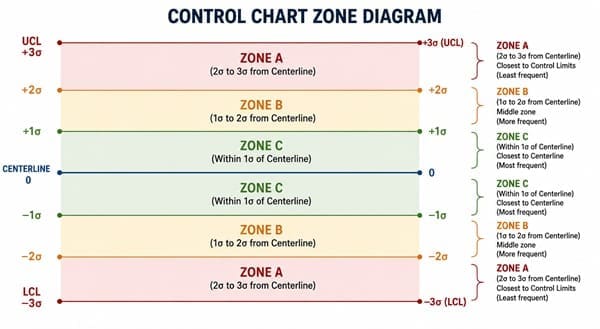
Before the decision rules can be understood, the zone system that defines them must be clear. A standard SPC control chart is divided into six zones — three on each side of the centerline — based on the distance from the mean in units of standard deviation (sigma, σ).
Zone C: The region between the centerline and 1σ on each side. This is the zone closest to the centerline. In a normally distributed, in-control process, approximately 68% of all data points fall within Zone C (combining both sides). Zone C is sometimes called the “common cause zone” because points here are expected under normal process behavior.
Zone B: The region between 1σ and 2σ on each side. In a normally distributed process, approximately 27% of data points fall in Zone B combined. Points in Zone B are less expected than Zone C but are still consistent with a stable process in isolation.
Zone A: The region between 2σ and 3σ on each side. Only approximately 4.3% of data points fall in Zone A combined in a normally distributed, stable process. A single point in Zone A is not a signal on its own, but patterns of multiple consecutive points in Zone A are statistically improbable under common cause variation alone.
Beyond Zone A (outside the control limits): Beyond ±3σ lies the region outside the UCL and LCL. In a normally distributed process, approximately 0.27% of all points fall outside the control limits by chance. A point here triggers the most fundamental decision rule.
The zone system applies to both sides of the centerline simultaneously — there is a Zone A, B, and C both above and below the centerline. Decision rules evaluate each side separately.
Also Read: Do Six Sigma Certifications Expire? ASQ and IASSC Rules Explained
The Four Western Electric (WECO) Rules
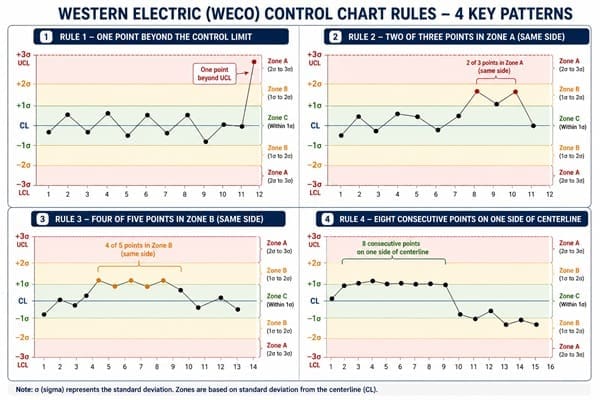
The Western Electric rules were codified by a specially appointed committee of the manufacturing division of the Western Electric Company. They were published in the first edition of the Statistical Quality Control Handbook in 1956, which became a foundational text in the field of SPC. According to Wikipedia’s documentation of this history, the handbook’s committee-developed rules became the standard for how control charts were interpreted in manufacturing environments.
The four WECO rules evaluate one side of the centerline at a time. A signal on either side — above or below the centerline — triggers the rule.
WECO Rule 1: One Point Beyond the Control Limits
Signal condition: One single data point falls outside the Upper Control Limit (UCL) or below the Lower Control Limit (LCL) — beyond ±3σ from the centerline.
This is the most fundamental decision rule. It directly tests whether a data point has fallen into the region where only 0.27% of observations would be expected to fall by chance in a stable, normally distributed process. A single point outside the control limits is the strongest individual signal that something has changed in the process.
What it detects: A sudden, large shift in the process mean; a sudden increase in process spread; a single extreme event such as a defective raw material lot, a measurement error, or an equipment malfunction.
False alarm rate (Rule 1 alone): Approximately one false signal per 370 observations (0.27% probability per observation).
WECO Rule 2: Two of Three Consecutive Points in Zone A or Beyond on the Same Side
Signal condition: In any sequence of three consecutive data points, two or more fall in Zone A or beyond (between 2σ and 3σ, or outside the control limits entirely), and both are on the same side of the centerline.
This rule detects a sustained shift toward the control limits that is not large enough to trigger Rule 1 on its own. The probability of two consecutive points falling in Zone A by chance, on the same side, is very low in a stable process. The key requirement is that both qualifying points are on the same side — one above the centerline and one below would not trigger this rule.
What it detects: A moderate, sustained shift in the process mean toward one of the control limits; the beginning of a drift pattern before it reaches the control limit.
WECO Rule 3: Four of Five Consecutive Points in Zone B or Beyond on the Same Side
Signal condition: In any sequence of five consecutive data points, four or more fall in Zone B or beyond (between 1σ and 3σ, or outside the control limits), and all qualifying points are on the same side of the centerline.
This rule detects a smaller sustained shift — one that does not produce data in Zone A but consistently pushes data away from the centerline on one side. The fifth point (the one that does not qualify) can be on either side of the centerline.
What it detects: A small but persistent shift in the process mean that may indicate gradual process drift, such as tool wear, material degradation, or a slowly changing environmental condition.
WECO Rule 4: Eight or More Consecutive Points on the Same Side of the Centerline
Signal condition: Eight or more consecutive data points fall entirely on one side of the centerline (either all above or all below), regardless of which zone they occupy.
This rule does not depend on how far the points are from the centerline. It detects a sustained directional pattern — a run — where the process is consistently producing output above or consistently below its historical mean. In a stable process, a run of eight or more consecutive points on one side has a probability of approximately (0.5)^8 = 0.39%, making it a statistically improbable pattern from common cause variation alone.
What it detects: A sustained shift in the process mean that may be too small and gradual to push individual points into Zone A or B but is nonetheless real. Common causes include a systematic change in input materials, a process setting change, or a measurement system drift.
The Four Unnatural Patterns Decision Rules Detect

The WECO rules and their extensions are designed to detect four distinct unnatural patterns that indicate assignable causes of variation:
Instability — Individual points fall outside the control limits (Zone A or beyond). Rule 1 specifically tests for this. It indicates a sudden, large shift or extreme event.
Mixture — Points cluster near the control limits and rarely appear near the centerline. This produces a pattern with points in Zone A and B but few in Zone C. It may indicate that two different processes or distributions are being combined in the data — for example, mixing output from two machines with different process means into a single chart.
Stratification — Points cluster closely around the centerline and rarely appear in the outer zones. This is the opposite of mixture: almost all points fall in Zone C and very few approach Zones A or B. Stratification often occurs when the data on the control chart has been incorrectly sub-grouped, mixing high and low observations within each sample to artificially produce stable-looking data.
Trend or Drift — A series of points moves steadily in one direction across multiple zones. Rule 4 detects the sustained directional pattern (run), while Nelson’s Rule 5 (trend) detects six or more consecutive points that are all either increasing or decreasing.
Nelson Rules: The Eight-Rule Expansion
Lloyd S. Nelson, an American statistician, published an expanded set of eight rules in 1984 in the Journal of Quality Technology. The Nelson rules retain the four WECO rules as their foundation and add four additional tests for more complex patterns.
| Rule | Signal Condition | Pattern Detected |
| Nelson 1 (= WECO 1) | One point beyond ±3σ | Instability — sudden large shift |
| Nelson 2 | Nine consecutive points on one side of the centerline | Sustained mean shift (more conservative than WECO Rule 4) |
| Nelson 3 | Six consecutive points all increasing or all decreasing | Trend or drift |
| Nelson 4 | Fourteen consecutive points alternating up and down | Oscillation or over-adjustment |
| Nelson 5 (= WECO 2) | Two of three consecutive points beyond 2σ on the same side | Moderate sustained shift |
| Nelson 6 (= WECO 3) | Four of five consecutive points beyond 1σ on the same side | Small sustained shift |
| Nelson 7 | Fifteen consecutive points within Zone C (within ±1σ) | Stratification |
| Nelson 8 | Eight consecutive points beyond ±1σ on either side with none in Zone C | Mixture |
The key difference between WECO and Nelson rules is in the fourth rule: WECO uses eight consecutive points on one side of the centerline; Nelson uses nine. Nelson Rules 5–8 also add tests for patterns that WECO does not explicitly cover, particularly oscillation (over-correction causing alternating up-down patterns) and stratification (points hugging the centerline, indicating incorrect subgrouping).
Also Read: Multi-Criteria Decision Analysis (MCDA)
False Alarm Rates: The Tradeoff in Decision Rule Selection
Every decision rule generates a risk of false alarm — detecting a signal in data that is actually from a stable, in-control process. This is the SPC equivalent of alpha risk (Type I error) in hypothesis testing.
For Rule 1 applied alone, the false alarm rate is approximately one per 370 observations (based on the normal distribution’s 0.27% tail probability beyond ±3σ). When all four WECO rules are applied simultaneously to the same chart, the combined false alarm rate rises to approximately one per 91.75 observations, according to the analysis by Champ and Woodall (1987) documented in Technometrics.
This creates a real practical tradeoff. Applying more decision rules:
- Increases sensitivity — smaller or slower process shifts are detected faster.
- Increases false alarm rate — more investigation events occur even when the process is stable.
In Six Sigma projects, the selection of which decision rules to apply should be driven by the cost and consequence of each type of error. In a high-risk process where missing a real shift is costly (safety-critical manufacturing, pharmaceutical production), applying all rules and accepting a higher false alarm rate is usually appropriate. In a lower-risk process where false alarms generate significant disruption or cost, applying only Rule 1 and possibly Rule 4 may be the better choice.
Decision Rules in the DMAIC Control Phase
Decision rules are a Control phase tool. Their specific role in DMAIC is to define the trigger conditions for the response plan within the process control plan.
A control plan specifies what is measured, how often, by whom, and what to do when the measurement falls outside acceptable limits. Decision rules define the “when” — the precise conditions under which a practitioner must stop regular production, investigate, and take corrective action.
The typical Control phase sequence is:
- The team identifies the key process output variable (Y) to monitor.
- The appropriate control chart type is selected based on the data type (continuous or attribute) and subgroup size.
- Baseline data is used to calculate the centerline and control limits.
- Decision rules are selected based on the sensitivity required for this specific process.
- The control plan documents the selected rules, the response plan for each type of signal, the person responsible for monitoring, and the escalation path when a signal occurs.
Decision rules are also used retrospectively in the Analyze phase. When a team reviews historical process data for a DMAIC project, they apply decision rules to the historical control chart to identify when and how frequently the process has experienced out-of-control events — providing evidence for the project’s root cause investigation.
Decision Rules in Minitab
Minitab, the standard SPC software used in Six Sigma training, allows practitioners to select which decision rules to apply to any control chart.
In Minitab, after creating a control chart (e.g., Stat > Control Charts > Variables Charts for Subgroups > Xbar-R), the practitioner can access the tests for special causes through the chart’s options. Minitab labels these tests as “Tests 1 through 8,” which correspond to the eight Nelson rules. The practitioner selects which tests to apply, and Minitab flags any data point that triggers a selected rule directly on the chart with the rule number.
By default, Minitab applies Test 1 (one point beyond 3σ) and Test 2 (nine consecutive points on one side of the centerline — the Nelson version). Additional tests are enabled by the practitioner based on the sensitivity requirements of the specific process being monitored.
Frequently Asked Questions: Decision Rules in SPC
Q: What are decision rules in SPC?
A: Decision rules in SPC are specific criteria applied to control charts to identify patterns in the data that are statistically unlikely to occur from common cause (random) variation alone. When a data pattern satisfies one of these rules, it signals that an assignable cause has likely affected the process, and the process should be investigated. The most widely used decision rules are the Western Electric (WECO) rules, which were codified in 1956.
Q: What are the four Western Electric (WECO) rules?
A: The four WECO rules are: (1) one data point falls beyond the ±3σ control limits; (2) two of three consecutive points fall in Zone A or beyond on the same side of the centerline; (3) four of five consecutive points fall in Zone B or beyond on the same side of the centerline; and (4) eight or more consecutive points fall on the same side of the centerline regardless of which zone they occupy. Any of these patterns signals the need to investigate the process for an assignable cause.
Q: What are Zones A, B, and C in a control chart?
A: Zones A, B, and C divide the area between the centerline and each control limit into three equal bands of one standard deviation each. Zone C is closest to the centerline (0 to 1σ from the mean), Zone B is the middle band (1σ to 2σ from the mean), and Zone A is closest to the control limits (2σ to 3σ from the mean). There is a Zone A, B, and C on both sides of the centerline. Decision rules reference these zones to describe where patterns of data points fall relative to the process mean.
Q: What is the difference between Western Electric rules and Nelson rules?
A: The Western Electric (WECO) rules are the original four decision rules codified in 1956. Lloyd S. Nelson expanded them to eight rules in 1984. Nelson Rule 2 uses nine consecutive points on one side of the centerline (vs. eight in WECO Rule 4). Nelson Rules 5 through 8 add tests for trends, oscillation, stratification, and mixture patterns that the original WECO rules did not explicitly cover. The two rule sets have seven of their eight rules in common and differ only in Rule 2/Rule 4.
Q: What is a false alarm rate in decision rules and why does it matter?
A: The false alarm rate is the probability that a decision rule signals an out-of-control condition even when the process is actually stable. For WECO Rule 1 applied alone, the false alarm rate is approximately one per 370 observations (0.27% per observation). When all four WECO rules are applied simultaneously, the combined false alarm rate rises to approximately one per 91.75 observations.
Q: Where do decision rules fit in the Six Sigma DMAIC framework?
A: Decision rules are a Control phase tool. They define the trigger conditions documented in the process control plan — the specific patterns on a control chart that require the practitioner to stop, investigate, and take corrective action. Decision rules are also used retrospectively in the Analyze phase to review historical control charts and identify when the process experienced out-of-control events, providing evidence for root cause investigation.
Q: What are the four unnatural patterns that decision rules detect?
A: The four unnatural patterns are: instability (individual points outside the control limits, detected by Rule 1), mixture (points clustering near the control limits with few near the centerline, indicating two mixed sub-populations), stratification (points clustering tightly around the centerline, indicating incorrect subgrouping), and trends or shifts (sustained movement of points in one direction or on one side of the centerline, detected by Rules 3 and 4 and Nelson Rule 3).
Each pattern has a different root cause, which is why different rules are needed to detect different types of process changes.
Decision Rules Training in Six Sigma
Decision rules — including the four WECO rules, the zone definitions, the unnatural pattern types they detect, and the false alarm tradeoff — are testable content on both the IASSC Green Belt and Black Belt certification exams.
The Control phase curriculum in both certification levels requires practitioners to be able to identify which decision rule has been triggered by a given control chart pattern and to explain what type of process change each rule detects.
At Six Sigma Development Solutions Inc., decision rules, SPC, and control chart interpretation are taught as applied Control phase skills in our Green Belt and Black Belt training programs. Practitioners work through real DMAIC project scenarios, build and interpret control charts in Minitab, and learn to design a control plan that uses decision rules as the trigger for a structured response.
We offer Six Sigma training in three formats:
- Onsite training — Delivered at your facility, using your actual process data to build and interpret control charts and apply decision rules in the Control phase curriculum.
- Live virtual training — Instructor-led sessions delivered online, including guided Minitab exercises covering control chart construction, zone identification, and decision rule application.
- Online training — Self-paced Green Belt and Black Belt certification programs covering all IASSC-testable SPC and Control phase content.
Explore our Six Sigma training programs or contact our team to find the right program for your certification goals.
About Six Sigma Development Solutions, Inc.
Six Sigma Development Solutions, Inc. offers onsite, public, and virtual Lean Six Sigma certification training. We are an Accredited Training Organization by the IASSC (International Association of Six Sigma Certification). We offer Lean Six Sigma Green Belt, Black Belt, and Yellow Belt, as well as LEAN certifications.
Book a Call and Let us know how we can help meet your training needs.


