In science and engineering, we use accuracy and precision to assess the reliability of measurements. However, people often misunderstand or confuse these terms.
Accuracy and precision represent distinct concepts, despite their common misuse. This article will explore the definitions of accuracy and precision, examine how they differ, and present examples to clarify their importance in measurements and scientific analysis.
Table of contents
What is Accuracy?
Accuracy refers to how close a measurement is to the true or accepted value of the quantity being measured. It is an indicator of the correctness of a measurement and evaluates the total error in the measurement without necessarily identifying the source of the error. The accuracy of a measurement expresses the percentage error. This percentage error measures how far the observed value deviates from the expected or theoretical value.
Accuracy, as defined by the International Vocabulary of Metrology (VIM), describes how close a measurement is to the true value. The true value represents what is being measured. Accuracy reflects the agreement between the result of a measurement and the true value.
In simple terms, it shows how near a measurement is to the actual value. Practically, we consider the “true value” theoretical because no measurement can be entirely perfect. This makes accuracy inherently a qualitative concept. Consequently, we cannot definitively know the true value.
However, scientists still use the concept of accuracy in everyday work by introducing an approximation known as the “conventional true value” or reference value, which serves as the best estimate of the true value. This allows them to evaluate how close a measurement is to this reference value, thus estimating the accuracy.
For example, if you are attempting to measure 25.0 mL of a liquid and you actually dispense 24.9 mL, your measurement is more accurate than if you had dispensed 25.7 mL. The percent error for each case can be calculated using the formula:
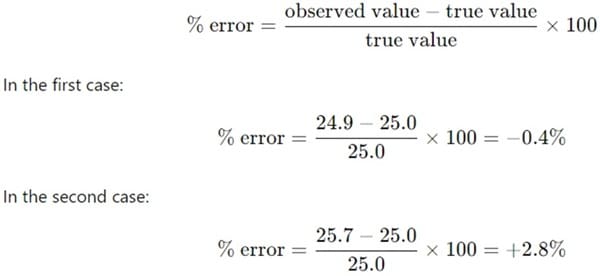
As we can see, the first measurement is more accurate because its percent error is smaller, indicating a closer approximation to the true value.
Types of Errors Affecting Accuracy
Measurements in analytical chemistry are prone to two main types of errors that affect accuracy: systematic errors and random errors.
- Systematic Errors: These occur due to consistent, predictable biases in measurement. They might be caused by malfunctioning equipment, flawed experimental designs, or user errors. For example, a balance that consistently adds an extra 0.01 grams to a measurement introduces a systematic error. Systematic errors can often be detected and corrected, making them avoidable.
- Random Errors: These errors arise from unpredictable variations in measurements. Unlike systematic errors, random errors do not have a consistent pattern and are equally likely to cause a measurement to be higher or lower than the true value. Inherent limitations in measurement instruments or physical conditions cause random errors. You cannot completely eliminate random errors. However, you can minimize them by making multiple measurements. Then, average the results to reduce the impact of these errors.
What is Precision?
Precision, on the other hand, refers to the reproducibility of measurements. It is the degree to which repeated measurements under the same conditions yield the same result. Precision is not concerned with how close the measurements are to the true value but focuses on how consistent the measurements are with each other. If you take multiple measurements, precision evaluates how much the individual measurements vary from each other.
Precision is the consistency or repeatability of a set of measurements. In simpler terms, precision indicates how close the measurements are to each other, regardless of whether they are close to the true value. Statisticians often express precision in terms of statistical measures like standard deviation. Standard deviation quantifies how spread out the measurements are from the average (mean) of the set.
While precision might seem like a good indicator of accurate results, it doesn’t necessarily imply accuracy. A set of measurements can be highly precise (i.e., the results are very consistent) but still be inaccurate if they all suffer from a systematic error.
To quantify precision, we often use the standard deviation, which is a statistical measure of how spread out the values in a data set are. The standard deviation is given by:
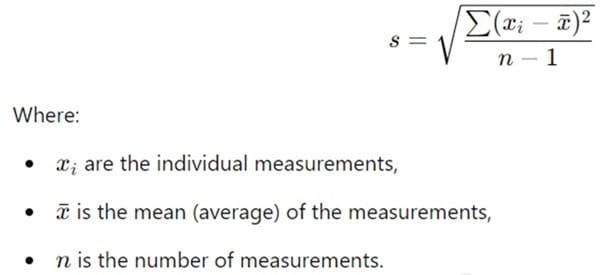
For example, consider the pH measurements 6.76, 6.73, and 6.78. The mean is:

The standard deviation for these values is:

A smaller standard deviation indicates that the measurements are closely grouped. This implies higher precision. Precision can also be expressed as the relative standard deviation (RSD). RSD normalizes the standard deviation by dividing it by the mean and expressing it as a percentage.

A low RSD suggests that the measurements are very consistent with each other, which is an indication of high precision.
Types of Precision
The VIM defines two important concepts related to precision: repeatability and reproducibility.
- Repeatability: This refers to the closeness of agreement between successive measurements taken under the same conditions. Repeatability conditions include using the same measurement procedure, the same instrument, and the same observer, all within a short period of time. High repeatability indicates that the measurement process is stable and reliable.
- Reproducibility: Reproducibility refers to the closeness of agreement between measurements taken under different conditions. These conditions can include changes in the measurement method, the instrument used, the observer, or the environment. High reproducibility suggests that a measurement method can yield consistent results even when certain variables are altered.
Key Differences Between Accuracy and Precision
While both accuracy and precision are important in measurements, they serve different purposes:
- Accuracy tells us how close a measurement is to the true or accepted value.
- Precision tells us how consistently we can reproduce a measurement.
In an ideal scenario, measurements are both accurate and precise, meaning they are both close to the true value and consistent with each other. However, it is possible to have high accuracy without precision, high precision without accuracy, or neither.
| Basis | Accuracy | Precision |
| Definition | Closeness of a measured value to the true value. | Closeness of multiple measurements to each other. |
| Focus | Measures correctness. | Measures consistency. |
| Error | Affected by both systematic and random errors. | Mainly affected by random errors. |
| True Value | Refers to how close a measurement is to the true value. | Does not consider the true value, only consistency among measurements. |
| Example | A dart hitting near the bullseye on a dartboard. | Darts tightly clustered together, regardless of location on the board. |
| Indication | Tells how close the result is to the actual or reference value. | Tells how reliable or repeatable the measurement process is. |
| Systematic Error Impact | Can be poor even if measurements are precise, if there is a bias. | Can be high despite poor accuracy if errors are consistent. |
| Quantitative Estimation | Can be estimated by comparing measured results to a known or reference value. | Quantified using metrics like standard deviation or variance. |
| Related Concepts | Bias and systematic errors. | Repeatability and reproducibility. |
| Usage in Context | Important when determining how valid the result is. | Important when measuring how consistent methods or instruments are. |
| Outcome | High accuracy indicates that measurements are close to the true value. | A weighing scale that shows the correct weight (close to the true value). |
| Practical Scenario | A weighing scale that shows the correct weight (close to true value). | A scale that shows the same weight every time, even if it’s wrong. |
Accuracy and Precision
The difference between accuracy and precision can be illustrated through examples.
- Accurate but Not Precise: Imagine you are throwing darts at a dartboard. Your darts consistently land near the bullseye (true value). However, they are scattered across the board (inconsistent). This means your throws are accurate but not precise.
- Precise but Not Accurate: Now, if your darts consistently hit the same spot on the board, but far from the bullseye, your throws are precise but not accurate. This indicates a systematic error that is causing the consistent bias away from the true value.
- Accurate and Precise: In the ideal scenario, your darts would land both near the bullseye and close together, meaning your throws are both accurate and precise. This is the ultimate goal in any measurement process.
- Neither Accurate Nor Precise: If your darts land all over the board with no pattern and far from the bullseye, your throws are neither accurate nor precise. This scenario represents the worst case in both measurement consistency and correctness.
Illustrating Accuracy and Precision: The Dartboard Example
A popular analogy to illustrate the difference between accuracy and precision is the example of a dartboard:
- High accuracy, low precision: The darts spread out in this scenario. Their average position is close to the bullseye (true value). The darts do not group consistently. However, the overall result is close to the target. You have good accuracy but poor precision.
- High precision, low accuracy: The darts are closely grouped, but they are far from the bullseye. In this case, the measurements are consistent with each other but do not reflect the true value. You have good precision but poor accuracy.
- High accuracy, high precision: The ideal scenario where the darts are closely grouped around the bullseye. The measurements are both consistent and close to the true value.
- Low accuracy, low precision: The worst-case scenario where the darts are spread out and far from the bullseye. The measurements are neither consistent nor close to the true value.
Mathematical Representation
To understand these concepts further, let’s consider the following mathematical representation of accuracy and precision in a hypothetical experiment using a voltmeter.
Suppose we are measuring the voltage of a circuit, and the true voltage (CTV – Conventional True Value) is 50 volts. We take four measurements: 47, 52, 51, and 48 volts.
- Maximum absolute deviation: We calculate how far the highest and lowest measurements deviate from the true value:
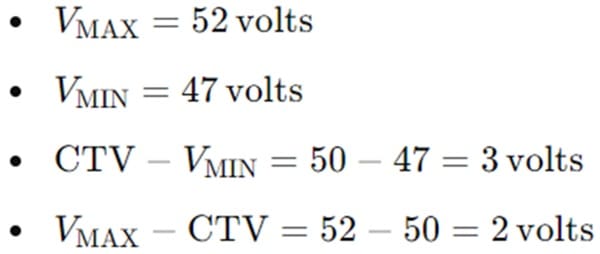
The maximum deviation is 3 volts, so the absolute accuracy is 3 volts.
- Relative accuracy: To express this as a percentage of the true value, we divide the absolute accuracy by the true value and multiply by 100:

Thus, the measurement has a relative accuracy of 6%.
Precision Calculation
Next, we calculate the precision of the voltmeter. Precision measures how consistently an instrument provides the same reading. It assesses the ability of the instrument to give the same result repeatedly.
Using the average of the measurements:

We then compute the maximum deviations from the average:

Thus, the precision of the measurements is 2.5 volts.
Practical Applications of Accuracy and Precision
In real-world scenarios, both accuracy and precision are vital, particularly in fields like manufacturing, engineering, and scientific research. For instance, in pharmaceuticals, a high degree of precision is needed to ensure consistent dosages in medications. However, these measurements must also be accurate to avoid harmful overdoses or underdoses.
Similarly, in fields like aerospace engineering, precision ensures that components fit together as expected, while accuracy ensures that calculations and simulations correspond to real-world conditions, preventing catastrophic failures.
Why Good Precision Does Not Guarantee Good Accuracy?
It may seem intuitive to think that if measurements are highly precise, they must also be accurate. However, this is not always the case. Precision only indicates the consistency of measurements, not their closeness to the true value. If systematic errors are present, measurements can be very consistent but still far from the true value, leading to high precision but poor accuracy.
For example, an instrument that consistently overestimates weight due to a calibration error will produce precise measurements because they are consistent with each other. However, because of the systematic error, these measurements will not be accurate.
Improving Accuracy and Precision
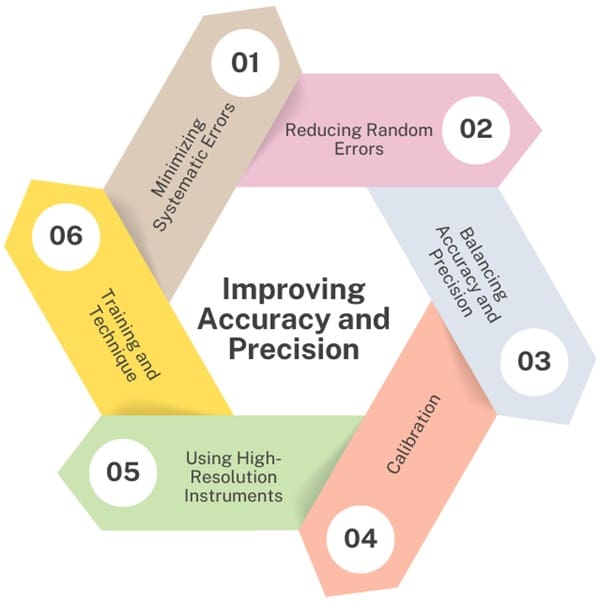
In scientific and industrial settings, improving both accuracy and precision is crucial for reliable data.
- Minimizing Systematic Errors: To improve accuracy, it is important to identify and eliminate sources of systematic errors. To achieve this, regularly calibrate the instruments. Use proper experimental techniques and ensure that the equipment is well-maintained. Using reference standards and comparing measurements against known values also helps to minimize bias.
- Reducing Random Errors: To improve precision, one must minimize random errors. This is often done by repeating measurements and calculating the mean result. More precise instruments with lower uncertainty, such as higher-quality balances or measuring devices, can also help.
- Balancing Accuracy and Precision: In practice, scientists aim to achieve a balance between accuracy and precision. High precision allows for consistency in measurements, while high accuracy ensures that those measurements are close to the true value. For example, in drug manufacturing, both accuracy (correct dosage) and precision (consistent production) are crucial for product safety and efficacy.
- Calibration: Regularly calibrating instruments against known standards can help improve accuracy by minimizing systematic errors.
- Using High-Resolution Instruments: Instruments with finer scales or more significant figures can provide more precise measurements, enhancing overall reliability.
- Training and Technique: The skill of the person making the measurements also plays a role. Proper training and familiarity with the instruments can minimize human error and improve both accuracy and precision.
Role of Statistical Analysis
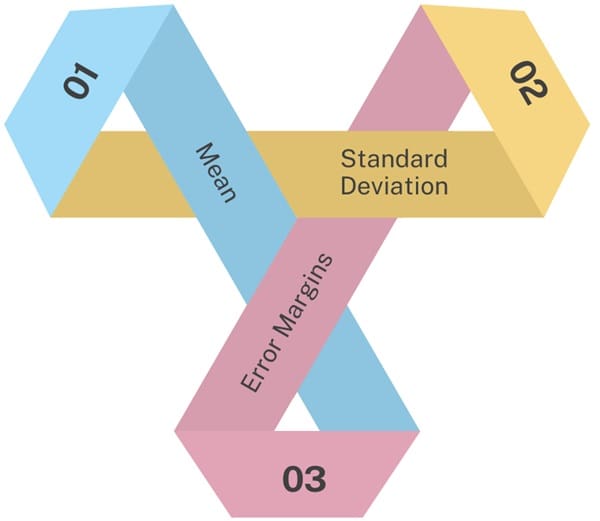
Statistical methods play an important role in evaluating both accuracy and precision. Common statistical tools include:
- Mean: The average of a set of measurements, used to estimate the central value.
- Standard Deviation: A measure of how much measurements vary from the mean, which indicates precision.
- Error Margins: Defined ranges within which measurements are expected to fall, accounting for uncertainties in both random and systematic errors.
Final Words
Accuracy and precision are distinct yet equally important aspects of measurement quality. While accuracy is about how close a measurement is to the true value, precision is about the consistency of repeated measurements. Both are necessary for reliable scientific analysis and understanding the difference helps in interpreting data correctly and improving measurement techniques.

About Six Sigma Development Solutions, Inc.
Six Sigma Development Solutions, Inc. offers onsite, public, and virtual Lean Six Sigma certification training. We are an Accredited Training Organization by the IASSC (International Association of Six Sigma Certification). We offer Lean Six Sigma Green Belt, Black Belt, and Yellow Belt, as well as LEAN certifications.
Book a Call and Let us know how we can help meet your training needs.

