Table of contents
How to Create Swimming Lane Process Maps
Are you looking to streamline your workflow and enhance collaboration within your team? If so, exploring the world of process mapping swim lanes might be the answer you’ve been searching for. In this article, we’ll dive into the depths of “process mapping swim lanes” .Let’s unravel the mystery behind these terms and discover how incorporating swim lane process maps can revolutionize your approach to work.
What are they?
Before we plunge into the details of creating swim lane process maps, let’s first understand what they are and their primary purpose. Swim lane process maps are a powerful visual tool used in various industries and organizations to illustrate and analyze complex workflows, business processes, or procedures. These maps provide a clear and structured representation of how tasks, activities, and responsibilities are divided among different individuals, teams, or departments within a larger process. They are particularly useful for enhancing process transparency, identifying bottlenecks, and improving overall efficiency.

The Advantages of Using Swim Lane Maps
Now that we’ve delved into the essence of swim lane process maps, it’s essential to thoroughly explore the myriad advantages they bring to the table when integrated into your work routine. One of the most prominent benefits is the heightened level of transparency they afford. These maps act as a panoramic window into your processes, offering a comprehensive, bird’s-eye view of the entire procedure. This vantage point allows team members to grasp the bigger picture and comprehend how their individual contributions seamlessly interlace within the larger workflow. Consequently, this heightened transparency becomes a catalyst for improved communication and collaboration, significantly diminishing the likelihood of bottlenecks and misunderstandings.
With distinct lanes allocated for each participant or department, it becomes glaringly evident who bears responsibility for each step of the process. This clarity not only mitigates confusion but also instills a sense of ownership and accountability among team members, promoting a heightened commitment to the successful execution of their designated tasks. Furthermore, the visual nature of swim lane maps makes them incredibly user-friendly, rendering onboarding and training processes notably more efficient. New team members can swiftly acclimate themselves to the workflow, and existing ones can easily reference and understand their roles, ultimately contributing to an overall boost in productivity and cohesiveness within your organization.
How to Create Swim Lane Maps
Now that we’ve highlighted the advantages, let’s get practical. Here’s a step-by-step guide to help you navigate the waters of swim lane mapping:
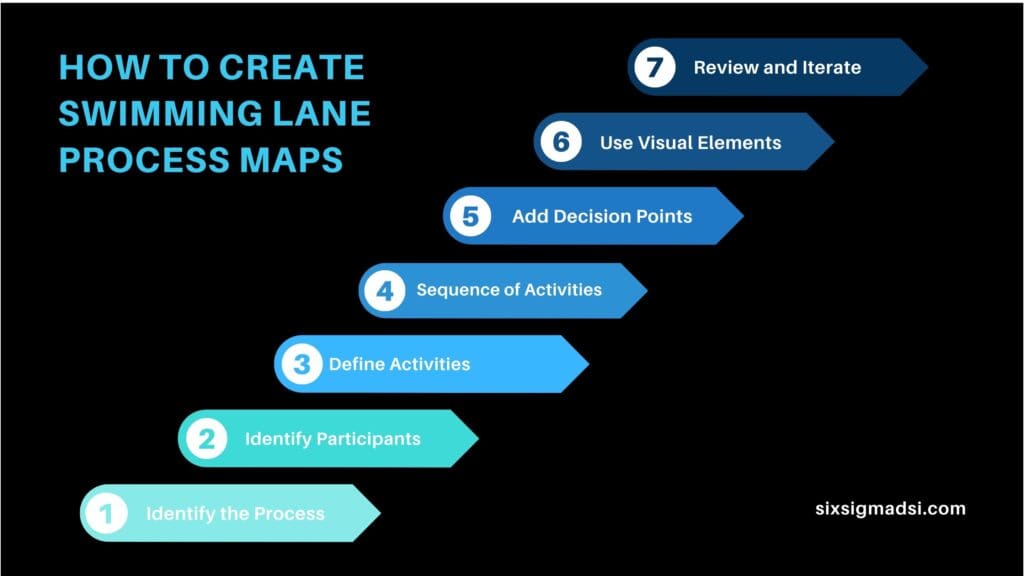
Creating swim lane maps is a methodical process that requires attention to detail and a strategic approach. To help you navigate this process effectively, let’s delve into a comprehensive step-by-step guide, breaking down each stage for a more in-depth understanding of swim lane mapping. By following these detailed instructions, you’ll be well-prepared to harness the power of swim lane maps and leverage them to improve your processes and workflows.
1. Clarify the Scope:
Begin by defining the precise scope of the process you intend to map. Whether it’s a specific project, a product development cycle, or a service delivery process, having a clear understanding of the boundaries and objectives is crucial. This initial step lays the foundation for a successful swim lane map.
2. Participant Identification:
Identify the key participants or departments that play a role in the process. Each of these entities will be allocated their dedicated “lane” on the swim lane map. Assigning lanes to participants ensures that responsibilities and accountabilities are visually represented.
3. Activity Breakdown:
Dive into the process and meticulously break it down into individual activities or tasks. Assign each of these activities to the appropriate lane, indicating which participant is responsible for its execution. This level of granularity ensures that every aspect of the process is accounted for.
4. Sequence of Activities:
Organize the activities within each lane in chronological order, reflecting the natural flow of the process. This sequencing helps identify dependencies between tasks and potential bottlenecks that may need to be addressed to enhance efficiency.
5. Decision Points and Handoffs:
Mark decision points within the process where choices need to be made, such as branching paths or critical decision-making moments. Additionally, indicate points where one participant hands off the work to another. This highlights areas of collaboration and transition within the workflow.
6. Utilize Visual Enhancements:
Enhance the visual clarity of your swim lane map by incorporating elements like colors, icons, or specific shapes. Visual cues make it easier for viewers to interpret and understand the map, especially at a glance. Color coding, for example, can help differentiate lanes or highlight critical elements.
7. Feedback, Review, and Iteration:
With your initial swim lane map in hand, seek feedback from team members, stakeholders, or process experts. This collaborative approach can reveal valuable insights and perspectives that may lead to refinements and improvements. Iterating based on this feedback ensures that the map accurately reflects the real-world workflow and is a valuable resource for your organization.
By following these comprehensive steps, you’ll be well-equipped to create swim lane maps that not only enhance process transparency but also become valuable tools for communication, collaboration, and continuous process improvement within your organization. These detailed maps offer a holistic view of your processes and provide a foundation for informed decision-making and optimization.

Examples of Swim Lane Maps
To provide a clearer understanding, let’s explore some scenarios where they can be a game-changer:
- Project Management: Visualize the stages of a project, with each department or team member having their designated lane.
- Order Processing: Illustrate the journey of an order from initiation to fulfillment, involving various departments like sales, inventory, and shipping.
- Customer Support: Map out the customer support process, indicating the responsibilities of different teams such as front-line support, technical specialists, and customer feedback handlers.

How Can Swim Lane Maps Improve Your Efficiency?
Now that you’ve learned how to create swim lane process maps, it’s crucial to understand how they contribute to improved efficiency. Swim Lane Maps, when used effectively, can significantly enhance your operational efficiency in various ways. These visual tools are instrumental in streamlining processes, allowing you to pinpoint and address areas where improvements can be made. By offering a comprehensive and easily digestible overview of the entire workflow, they help in identifying bottlenecks, eliminating redundancy, and optimizing resource allocation. As a result, you can expedite project completion, ensuring that tasks are completed in a timely manner. Additionally, by minimizing errors and enhancing coordination among team members, swim lane maps pave the way for an overall elevation in the quality of work produced. This improvement in efficiency doesn’t just benefit your day-to-day operations but also enhances customer satisfaction and your bottom line, as you deliver high-quality results more consistently. So, the adoption of swim lane maps is not just a smart move; it’s an essential step in the direction of operational excellence.
Have you ventured into swim lane process mapping?
What challenges have you faced, and how has it impacted your workflow?
Share your thoughts and experiences in the comments below! Embracing new tools and methodologies is a journey, and your insights can spark valuable discussions in our community. Let’s navigate the currents of process improvement together!


